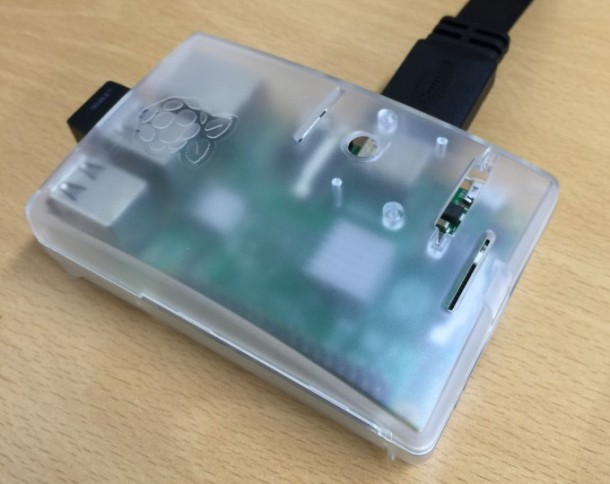
라즈베리파이에 관심을 가진 건 오래되었지만, 42인치 TV를 얻게 되어서 이참에 홈 미디어 센터를 구축해보자 해서 라즈베리파이2를 구하였습니다.
라즈베리파이란?
라즈베리 파이(Raspberry Pi)는 영국의 라즈베리 파이 재단이 학교에서 기초 컴퓨터 과학 교육을 증진시키기 위해 만든 싱글 보드 컴퓨터이다. 라즈베리 파이는 그래픽 성능이 뛰어나면서도 저렴한 가격(세금을 포함하지 않은 모델 A의 경우 25달러, 모델 B, 모델 B+, 2세대 모델 2의 경우 35달러)라는 특징을 갖고 있다.
이번에 나온 라즈베리파이2는 900MHz 쿼드코어 CPU와 1GB 기존 모델보다 2배 큰 램이 장착되어있습니다. 라즈베리파이에 설치할 수 있는 OS가 여러가지 있지만 사용할 목적은 XBMC를 이용한 미디어 센터이기 때문에 OpenELEC를 선택하였습니다.
OpenELEC를 설치하기 전 준비물을 소개합니다.

준비물
– 라즈베리파이2
– HDMI 케이블
– SD카드
– 5핀 충전기(2000mA)
– 마우스
– 랜 케이블 or Wifi 동글
– 기타: 라즈베리파이2 케이스(B+ 케이스와 호환), 방열판
저는 인터넷 공유기와 거리가 멀기 때문에 Wifi 동글을 구매하였습니다. 참고로 OpenELEC에서는 쉽게 와이파이와 블루투스를 연결할 수 있습니다.
준비물이 다 갖춰졌으니 SD카드에 OpenELEC를 설치합니다.
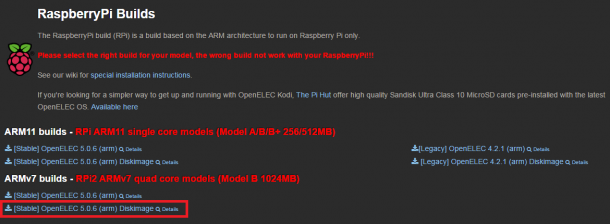
OpenELEC 다운로드
https://github.com/OpenELEC/OpenELEC.tv

ARMv7 builds의 OpenELEC Diskimage 파일로 다운로드합니다.
압축을 푼 img 파일을 아래 프로그램을 통해 SD카드에 넣습니다.
Win32 Disk Imager 다운로드
http://sourceforge.net/projects/win32diskimager/
SD카드에 img 파일을 설치하면 600mb 정도 파티션이 나누어 지면서 OpenELEC가 들어갑니다. 나머지 용량은 초기 설정이 완료되면 나머지 공간이 확장됩니다. 우선 SD카드 안에 있는 config.txt 파일을 열어 오버클럭을 하도록 하겠습니다.
config.txt 오버클럭 하기(옵션)
초기 설정에 들어가기 전 SD카드 안에 있는 config.txt 파일을 수정하여 라즈베리파이2를 조금 오버클럭해보겠습니다.
오버클럭 보기
[config.txt]################################################################################ # This file is part of OpenELEC - http://www.openelec.tv # Copyright (C) 2009-2014 Stephan Raue ([email protected]) # Inspired and partly copied from: # http://youresuchageek.blogspot.fr/2012/09/howto-raspberry-pi-openelec-on.html # # OpenELEC is free software: you can redistribute it and/or modify # it under the terms of the GNU General Public License as published by # the Free Software Foundation, either version 2 of the License, or # (at your option) any later version. # # OpenELEC is distributed in the hope that it will be useful, # but WITHOUT ANY WARRANTY; without even the implied warranty of # MERCHANTABILITY or FITNESS FOR A PARTICULAR PURPOSE. See the # GNU General Public License for more details. # # You should have received a copy of the GNU General Public License # along with OpenELEC. If not, see <http://www.gnu.org/licenses/>. ################################################################################ # Bootloader configuration - config.txt ################################################################################ ################################################################################ # Memory (System/GPU configuration ) ################################################################################ # default GPU memory split (do not change if you do not know what you are doing) gpu_mem=320 # SDRAM size based GPU memory split, uncomment and setup to override 'gpu_mem' gpu_mem_256=112 gpu_mem_512=160 gpu_mem_1024=256 ################################################################################ # Overclocking settings # WARNING: Do not change/enable if you do not know what you are doing! # The System may become unstable or you can have data corruption or # you can loose your warranty if you set wrong settings # # please read: http://elinux.org/RPi_config.txt#Overclocking_configuration ################################################################################ # Overclock mode settings. # # default recommended values are: arm_freq | core_freq | sdram_freq | over_voltage # no overclocking : 700 | 250 | 400 | 0 # mode 'Modest' : 800 | 300 | 400 | 0 # mode 'Medium' : 900 | 333 | 450 | 2 # mode 'High' : 950 | 450 | 450 | 6 # mode 'Turbo' : 1000 | 500 | 500 | 6 arm_freq=1000 core_freq=500 sdram_freq=500 over_voltage=2 arm_freq_min=400 sdram_freq_min=250 core_freq_min=250 # set to 'force_turbo=1' to disable dynamic overclocking (you can lose your warranty!) force_turbo=0 # If you have any data corruption using Turbo Mode and overclocking # try with this setting uncommented # If this still fails, try to use Medium mode without "over_voltage=2" # If it ultimately keeps failing, forget about this until it gets fixed # Use a more conservative mode that will works fine in any cases: initial_turbo=30 #Does not affect warranty. (Speeds up boot) ################################################################################ # Overscan settings ################################################################################ # Make display smaller to stop text spilling off the screen # see also http://www.raspberrypi.org/phpBB3/viewtopic.php?f=67&t=15700 # overscan_scale=1 # disable_overscan=1 # Adapt overscan values to your needs # overscan_left=57 # overscan_right=59 # overscan_top=20 # overscan_bottom=20 ################################################################################ # various settings see also: http://elinux.org/RPi_config.txt ################################################################################ # Force HDMI even if unplugged or powered off # hdmi_force_hotplug=1 # Doesn't sent initial active source message. # Avoids bringing CEC (enabled TV) out of standby and channel switch when # rebooting. hdmi_ignore_cec_init=1 ################################################################################ # License keys to enable GPU hardware decoding for various codecs # to obtain keys visit the shop at http://www.raspberrypi.com ################################################################################ # decode_MPG2=0x00000000 # decode_WVC1=0x00000000 # decode_DTS=0x00000000 # decode_DDP=0x00000000 ################################################################################ # End of default configuration # all values below this line were inserted from config.txt.bk (your old config) # and can be merged with the above values ################################################################################ # USB Storage increase power max_usb_current=2 safe_mode_gpio=4 # Disable rainbow screen disable_splash=1 device_tree_overlay=overlays/enable-spi-overlay.dtb
[변경한 값]
gpu_mem=320
arm_freq=1000
core_freq=500
sdram_freq=500
over_voltage=2
arm_freq_min=400
sdram_freq_min=250
core_freq_min=250
initial_turbo=30
[하단에 추가]
# 단일 USB 외장하드 인식
max_usb_current=2
safe_mode_gpio=4
# 무지개 부팅 화면 삭제
disable_splash=1
이제 라즈베리파이에 SD카드를 넣고 모니터 or 티비에 연결합니다. 라즈베리파이는 따로 전원 스위치가 없어 충전기를 연결하기 전 키보드, 마우스, 랜 케이블, HDMI 케이블을 연결해야 합니다.
OpenELEC XBMC 초기 설정
초기 설정은 SSH 부분을 활성화 시키고 유선랜 선택하시고 다른 부분은 쭉 Next 해주시면 됩니다.
Wifi 동글을 이용하여 무선 인터넷으로 이용하실 경우 SSH 부분만 활성화 시키면 됩니다.
무선랜 활성화는 System -> OpeneELEC -> Network -> Wireless Network -> Active 활성화 후 Connection 항목에서 Wifi 연결
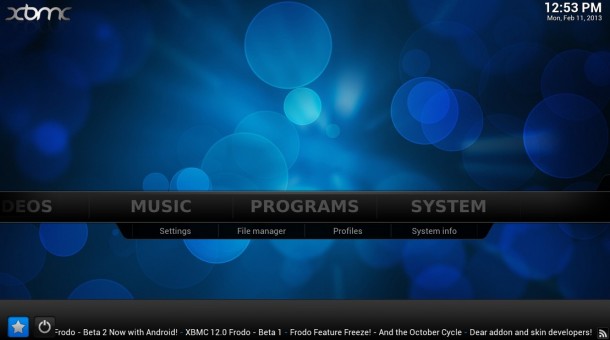
초기 설정이 완료되면 아래와 같은 메인 화면이 나옵니다.
이제 머리 아픈 영어를 한국어로 바꿔보겠습니다.

XBMC 한글화 하기
1. System -> Settings -> Appearance -> Fonts를 Arial based로 변경
2. International 항목에서 Language를 Korean으로 설정하면 한글로 바뀝니다.
3. 아래 시간대 국가도 바꿔주시면 현재 시간으로 변경됩니다.
다음 포스팅에서는 트랜스미션(transmission) 설치 방법에 대해서 알아보도록 하겠습니다.
라즈베리파이2 KODI(XBMC) OpenELEC 최적화, 트랜스미션(Transmission) 설치하기 Part 2

오오미~ 멋집니다
헤헤 감사합니다 ^~^
쥑이네~~
좋은 정보 감사합니다!!!
방문해주셔서 감사합니다^^
sd카드에 설치후 빨강 노랑 파랑 등등색이 섞여있는거에서 멈추네요
답변이 늦었습니다ㅠ
혹시 라즈베리파이2용 이미지로 설치하셨는지 확인해보세요!